Animals
How to Care for a Baby Red-Eared Slider: A Guide to Raising Young Turtles
How to Care for a Baby Red-Eared Slider: A Guide to Raising Young Turtles
So, you’ve decided to take on the noble task of raising a baby Red-Eared Slider. Congratulations! These little reptiles can make fantastic pets, but like any youngster, they require proper care and attention to thrive. Whether you’re a seasoned turtle enthusiast or a newbie to the world of reptile parenting.
However, similar to any young creature, they demand dedicated care and vigilance to flourish. Whether you find yourself a seasoned aficionado of turtles or a complete novice in the realm of reptile parenting, this all-encompassing guide is here to lend a helping hand.
Through the following comprehensive discourse, we shall navigate through the intricacies of nurturing your baby Red-Eared Slider, ensuring their well-being and vitality.
From establishing the ideal habitat to understanding their dietary requirements, from maintaining optimal temperature conditions to fostering interaction and companionship, every aspect of your journey as a turtle parent will be meticulously addressed. So, let us embark on this journey together, paving the way for your baby Red-Eared Slider to grow and thrive in a environment where happiness and health are paramount.
Understanding Your Baby Red-Eared Slider
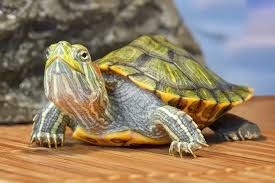
Before diving into the nitty-gritty of care, it’s essential to understand a bit about the species you’re bringing into your home. Red-Eared Sliders (Trachemys scripta elegans) are one of the most popular pet turtles globally, known for their striking red markings on each side of their heads. Native to the southern United States, these semi-aquatic turtles can live for several decades when properly cared for. As babies, they are tiny and delicate, but with the right care, they can grow into robust and captivating pets.
Creating the Ideal Habitat
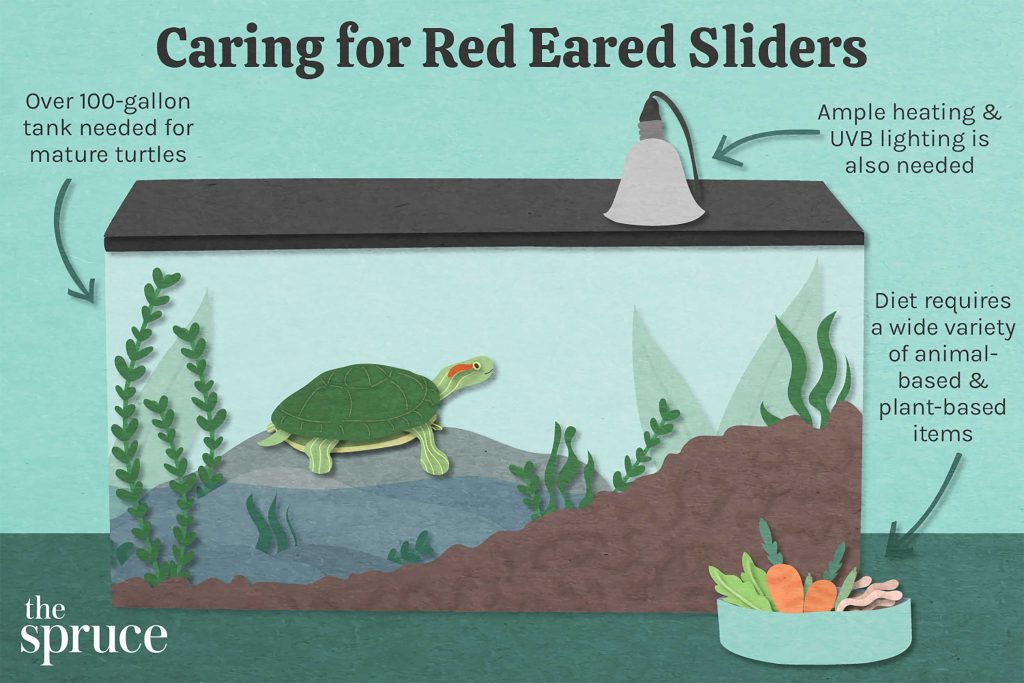
Setting up the perfect habitat is the first step in ensuring your baby Red-Eared Slider thrives. For young turtles, a spacious aquarium or tank is necessary, ideally a 20-gallon tank for a single turtle. Make sure to provide plenty of swimming space as well as a basking area where they can dry off and soak up some UVB rays.
A combination of a dry basking area and a warm, humid environment underwater mimics their natural habitat and encourages healthy growth.
Temperature and Lighting Requirements
Temperature regulation is crucial for the well-being of your baby Red-Eared Slider. Aim to maintain a water temperature between 75°F and 80°F (24°C and 27°C) and an air temperature around 85°F (29°C) in the basking area.
Use a combination of underwater heaters and basking lamps to achieve these temperatures, ensuring there are no drastic fluctuations throughout the day and night. Additionally, provide UVB lighting for at least 10-12 hours a day to support proper shell and bone development.
Achieving these ideal temperatures requires careful planning and the right equipment. Utilize a combination of underwater heaters to regulate the water temperature and basking lamps to provide warmth in the designated basking area.
By carefully calibrating these heating elements, you can create a stable and cozy environment for your baby Red-Eared Slider, minimizing the risk of stress or health complications due to temperature fluctuations.
Invest in high-quality UVB bulbs specifically designed for reptiles, positioning them within the habitat to mimic natural sunlight and promote vital physiological processes.
Feeding Your Baby Red-Eared Slider
Like all growing creatures, baby Red-Eared Sliders have hearty appetites and specific dietary needs. Offer a varied diet consisting mainly of commercial turtle pellets, supplemented with fresh vegetables such as leafy greens, carrots, and squash. Additionally, provide occasional treats like small fish, earthworms, or crickets to add variety and essential nutrients to their diet. Remember to remove any uneaten food promptly to maintain water quality.
Maintaining Water Quality
Clean water is vital for the health of your baby Red-Eared Slider. Invest in a high-quality water filtration system and perform regular water changes to remove waste and prevent the buildup of harmful bacteria.
Aim to replace 25-50% of the water in the tank every 2-4 weeks, depending on the size of your tank and the number of turtles you’re housing.
To monitor water quality effectively, it’s essential to test the water regularly for ammonia, nitrite, and nitrate levels. Elevated levels of these compounds can indicate poor water quality and pose a risk to your turtle’s health. By conducting routine water tests and addressing any issues promptly, you can maintain optimal conditions within the tank, promoting the well-being and vitality of your baby Red-Eared Slider.
By prioritizing cleanliness and water quality, you’re creating a safe and healthy habitat for your pet to thrive in. With proper care and attention to water maintenance, your baby Red-Eared Slider can enjoy a happy and fulfilling life in their aquatic home.
Handling and Interaction
While it’s tempting to handle your baby Red-Eared Slider frequently, it’s essential to approach handling with caution and respect for their delicate nature. Limit handling to short periods and always support their body properly to avoid stress or injury.
Encourage interaction through observing their behavior and providing enrichment activities like floating toys or live plants in their habitat. Remember, each turtle has its own personality, so take the time to get to know your pet’s preferences and boundaries.
It’s also essential to recognize that each turtle has its own unique personality and preferences. Take the time to get to know your pet’s likes and dislikes, paying attention to their reactions to different stimuli. Respect their boundaries and avoid forcing interaction if they seem hesitant or uncomfortable.

Health and Veterinary Care
Regular veterinary check-ups are essential for monitoring the health of your baby Red-Eared Slider. Schedule an appointment with a reptile specialist shortly after bringing your turtle home to ensure they are free from parasites and other health concerns.
Keep an eye out for signs of illness such as lethargy, loss of appetite, or abnormal behavior, and seek veterinary care immediately if you notice any concerning symptoms. Prevention is key, so maintain good hygiene practices and provide a healthy diet to minimize the risk of illness.
CONCLUSION
Remember, raising a baby Red-Eared Slider is a rewarding experience that requires dedication and commitment. By providing a suitable habitat, a balanced diet, and regular veterinary care, you can enjoy many years of companionship with your beloved pet.
If you have any concerns or questions along the way, don’t hesitate to reach out to fellow turtle enthusiasts or seek guidance from a reptile professional. With proper care and attention, your baby Red-Eared Slider will flourish and bring joy to your life for years to come.
Frequently Asked Questions About Baby Red-Eared Sliders
How often should I feed my baby Red-Eared Slider?
Feed your baby turtle daily, offering a combination of commercial pellets and fresh vegetables.
Do baby Red-Eared Sliders need a heat lamp?
Yes, provide a basking lamp to maintain proper temperature and lighting requirements.
Can baby Red-Eared Sliders live with other turtles?
While they can cohabitate, it’s essential to monitor behavior and ensure each turtle has enough space and resources.
How can I tell if my baby Red-Eared Slider is male or female?
Gender can be challenging to determine in young turtles but becomes more apparent as they mature. Consult a reptile expert for assistance.
Do baby Red-Eared Sliders need a UVB light?
Yes, UVB lighting is essential for proper shell and bone development in turtles.
What should I do if my baby Red-Eared Slider stops eating?
Monitor their behavior closely and consult a veterinarian if the loss of appetite persists for more than a few days.
How often should I clean my baby Red-Eared Slider’s tank?
Perform partial water changes every 2-4 weeks and deep clean the tank every 3-6 months to maintain water quality.
References:
- Red-Eared Slider Care Sheet. (n.d.). Retrieved from [link]
- Smith, J. (2020). The Red-Eared Slider: Everything about Its History, Care, and Conservation. Retrieved from [link]
- Johnson, R. (2019). A Complete Guide to Red-Eared Slider Turtle Care. Retrieved from [link]
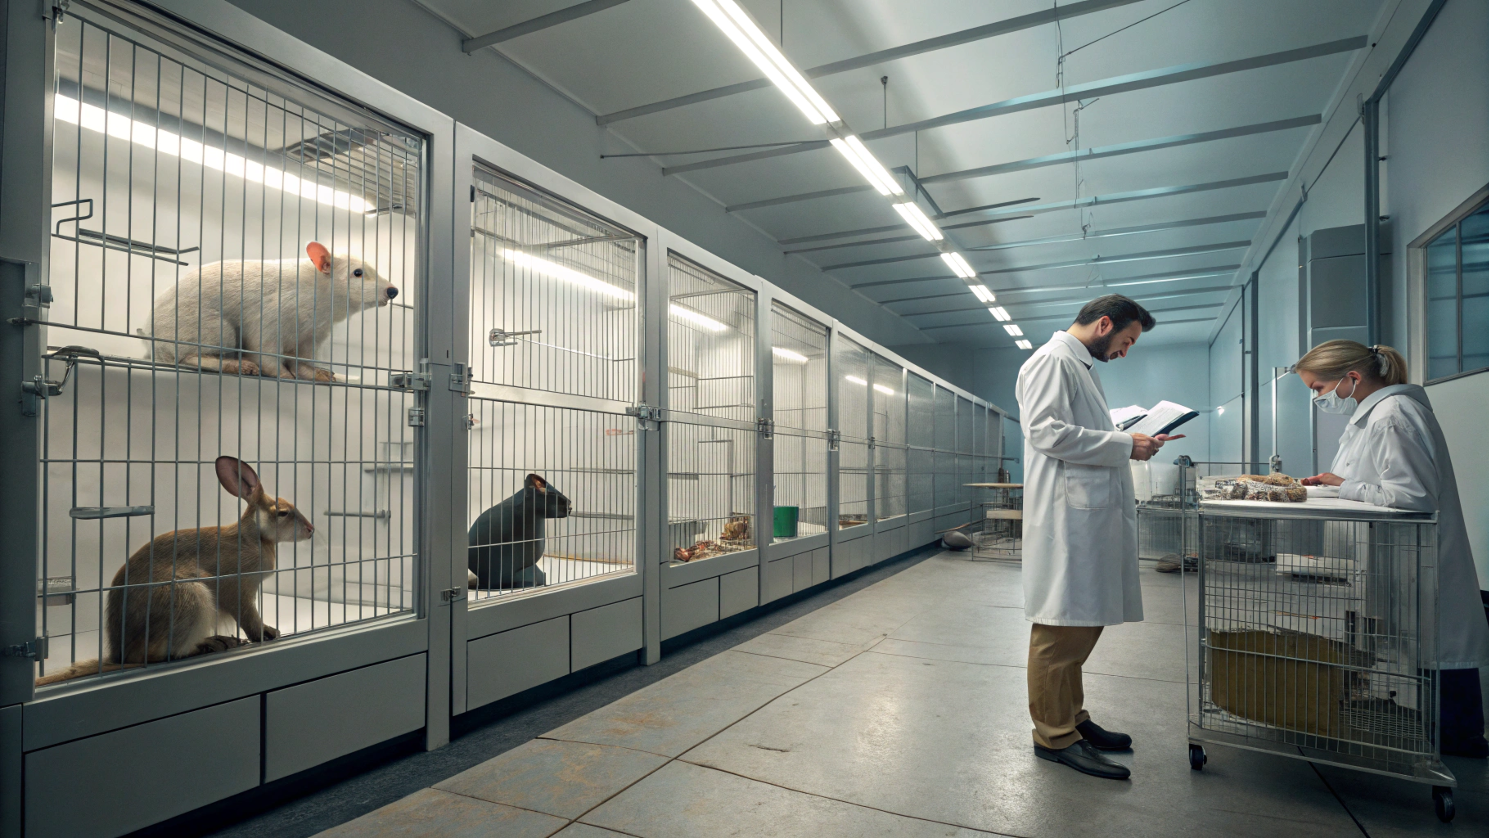
Animal testing has long been a contentious issue, sparking debates that span scientific, ethical, and philosophical domains. On one hand, animal testing has played a crucial role in advancing medical research, leading to breakthroughs in the treatment of diseases, the development of new drugs, and the understanding of biological processes.
On the other hand, the use of animals in experiments raises significant ethical concerns about animal welfare, the moral implications of causing suffering, and the validity of extrapolating results from animals to humans.
This article delves into the ethics of animal testing, exploring the arguments for and against it, the current state of regulations, and the ongoing quest to find alternatives that balance scientific progress with compassion for animals.
The Role of Animal Testing in Science
Historical Contributions
Animal testing has been instrumental in numerous scientific advancements. For instance, the development of vaccines for diseases such as polio and rabies relied heavily on animal experiments. Similarly, the discovery of insulin and the development of antibiotics were made possible through research involving animals.
Current Applications
Today, animal testing is used in a variety of fields, including:
- Medical Research: Testing new drugs, treatments, and surgical procedures.
- Toxicology: Assessing the safety of chemicals, cosmetics, and other products.
- Basic Science: Understanding biological processes and disease mechanisms.
Case Study: The Development of the Polio Vaccine
The development of the polio vaccine in the mid-20th century is a prime example of the importance of animal testing. Researchers used monkeys and mice to test the safety and efficacy of the vaccine before it was administered to humans, leading to the eventual eradication of polio in many parts of the world.
The Ethical Debate
Arguments in Favor of Animal Testing
Arguments Against Animal Testing
Case Study: The Thalidomide Tragedy
The thalidomide tragedy is a stark example of the limitations of animal testing. Thalidomide was tested on animals and deemed safe, but it caused thousands of birth defects in humans. This case highlights the potential for discrepancies between animal and human responses to drugs.
Current Regulations and Ethical Guidelines
International and National Regulations
Animal testing is subject to regulations and guidelines that vary by country. In the United States, the Animal Welfare Act and the Public Health Service Policy on Humane Care and Use of Laboratory Animals provide a framework for the ethical treatment of animals in research. The European Union has implemented the Directive 2010/63/EU, which sets strict standards for animal testing and promotes the use of alternatives.
The 3Rs Principle
The 3Rs principle—Replacement, Reduction, and Refinement—is a cornerstone of ethical animal testing. It advocates for:
- Replacement: Using alternative methods, such as computer modeling and in vitro studies, to replace animal testing.
- Reduction: Minimizing the number of animals used in experiments.
- Refinement: Improving experimental procedures to minimize pain and distress.
The Quest for Alternatives
In Vitro and In Silico Methods
Advances in technology have led to the development of alternative methods that reduce or eliminate the need for animal testing. In vitro methods, such as cell cultures and tissue engineering, allow researchers to study biological processes without using animals. In silico methods, such as computer modeling and simulation, provide tools for predicting the effects of drugs and chemicals.
Case Study: The Human-on-a-Chip
The “human-on-a-chip” is an innovative technology that uses microfluidic devices to mimic human organ systems. This technology has the potential to revolutionize drug testing by providing more accurate and ethical alternatives to animal models.
Public and Scientific Opinion
Public opinion on animal testing is divided, with many people calling for stricter regulations and the development of alternatives. Within the scientific community, there is growing interest in finding alternatives to animal testing, driven by ethical concerns and the limitations of animal models.
Conclusion: Striking a Balance
The ethics of animal testing is a complex and multifaceted issue that requires a delicate balance between scientific progress and compassion for animals. While animal testing has contributed to significant advancements in science and medicine, it is crucial to continue exploring and implementing alternatives that minimize animal suffering and address the ethical concerns surrounding the use of animals in research.
Frequently Asked Questions (FAQs)
1. What is animal testing?
Animal testing, also known as animal experimentation, is the use of animals in scientific research to study biological processes, test the safety and efficacy of drugs and chemicals, and develop new medical treatments.
2. Why is animal testing controversial?
Animal testing is controversial because it raises ethical concerns about animal welfare, the moral implications of causing suffering, and the validity of extrapolating results from animals to humans.
3. What are the alternatives to animal testing?
Alternatives to animal testing include in vitro methods, such as cell cultures and tissue engineering, and in silico methods, such as computer modeling and simulation.
4. What is the 3Rs principle?
The 3Rs principle—Replacement, Reduction, and Refinement—advocates for the use of alternatives to animal testing, minimizing the number of animals used, and improving experimental procedures to minimize pain and distress.
5. How can individuals support ethical animal testing?
Individuals can support ethical animal testing by advocating for the development and use of alternatives, supporting organizations that promote animal welfare, and staying informed about the issues surrounding animal testing.
References
Links
The story of animal evolution is a remarkable tale of adaptation, survival, and transformation. Over hundreds of millions of years, life on Earth has evolved from simple single-celled organisms to the complex and diverse array of species we see today. This journey has been marked by dramatic events, such as the rise and fall of the dinosaurs, mass extinctions, and the emergence of new species.
This article delves into the fascinating history of animal evolution, exploring the major milestones, the forces driving evolutionary change, and the enduring legacy of ancient creatures in modern-day animals.
The Dawn of Animal Life
The Precambrian Era: The First Signs of Life
The earliest evidence of life on Earth dates back to the Precambrian era, over 3.5 billion years ago. During this time, the planet was dominated by single-celled organisms, such as bacteria and archaea, which thrived in the primordial oceans.
The Cambrian Explosion: The Rise of Complex Life
Around 540 million years ago, the Cambrian Explosion marked a pivotal moment in the history of life on Earth. Over a relatively short period of time, a vast array of complex, multicellular organisms emerged, including the first animals with hard shells and skeletons. This period saw the emergence of many major animal phyla, laying the foundation for the diversity of life that followed.
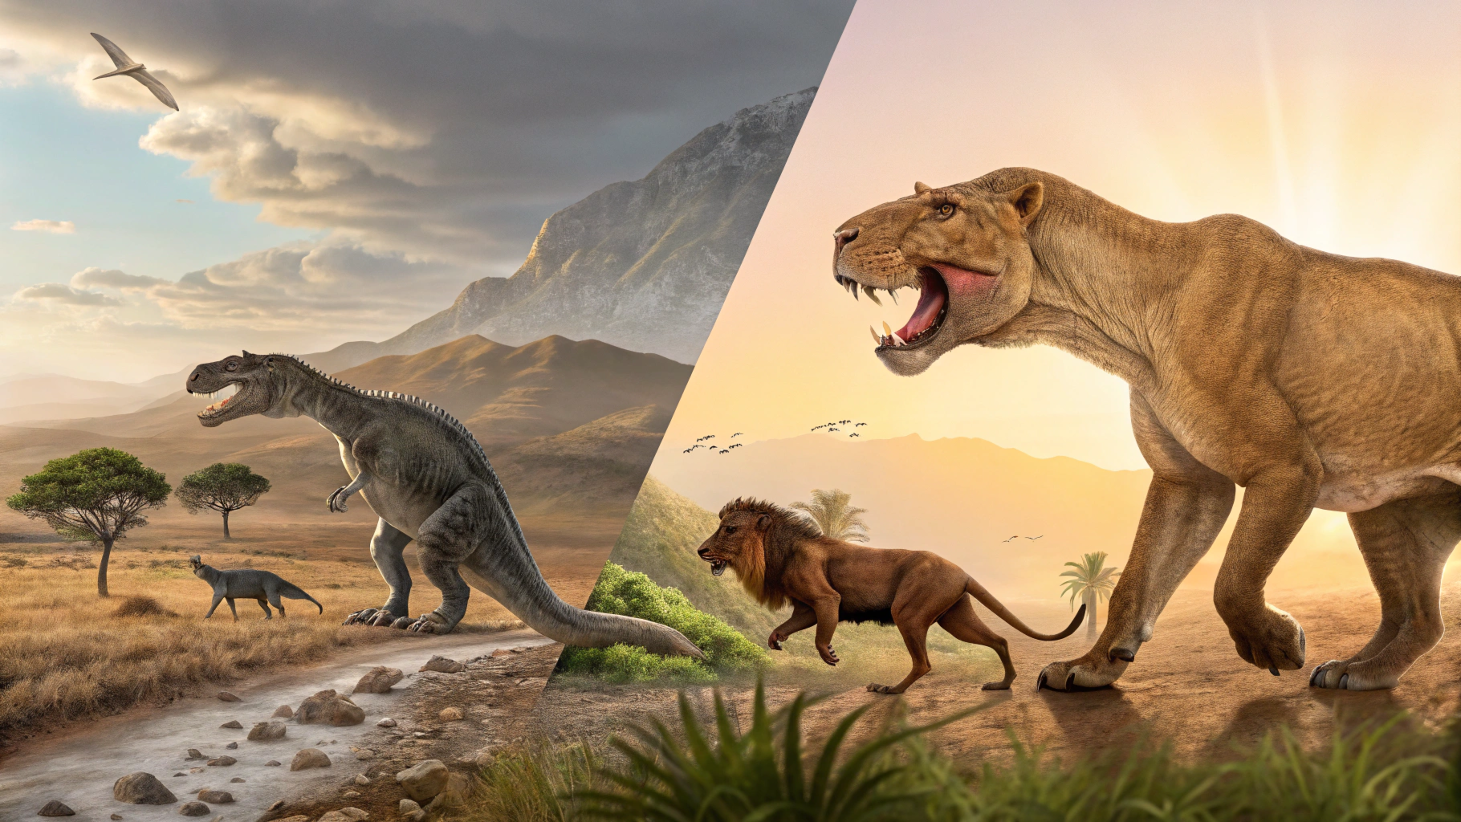
The Age of Dinosaurs
The Rise of the Dinosaurs
The Mesozoic Era, which began about 252 million years ago, is often referred to as the “Age of Dinosaurs.” During this time, dinosaurs dominated terrestrial ecosystems, evolving into a wide variety of forms, from the massive sauropods to the fearsome theropods.
Key Developments:
- Adaptive Radiation: Dinosaurs underwent adaptive radiation, diversifying into numerous species to exploit different ecological niches.
- Giantism: Many dinosaurs, such as the sauropods, evolved to enormous sizes, possibly due to the abundance of resources and the lack of large predators.
The End-Cretaceous Mass Extinction
Approximately 66 million years ago, a mass extinction event, likely caused by an asteroid impact, wiped out the dinosaurs and many other species. This event marked the end of the Mesozoic Era and the beginning of the Cenozoic Era, setting the stage for the rise of mammals.
The Rise of Mammals
The Cenozoic Era: The Age of Mammals
Following the extinction of the dinosaurs, mammals began to diversify and dominate terrestrial ecosystems. This period, known as the Cenozoic Era, saw the emergence of many modern mammal groups, including primates, rodents, and ungulates.
Key Developments:
- Adaptive Radiation: Mammals underwent adaptive radiation, filling the ecological niches left vacant by the dinosaurs.
- Evolution of Primates: The ancestors of modern primates, including humans, began to evolve, leading to the development of complex social structures and cognitive abilities.
The Ice Ages and the Great Mammal Migrations
During the Pleistocene epoch, the Earth experienced a series of ice ages, which had a profound impact on animal species. Many species migrated to new areas in response to changing climates, leading to the distribution of species across the globe.
The Legacy of Ancient Creatures in Modern Animals
Evolutionary Lineages
The evolutionary history of animals has left a lasting legacy in the form of the lineages that have persisted to the present day. Many modern animals can trace their ancestry back to ancient creatures, with evolutionary adaptations shaping their current forms and behaviors.
Case Study: The Coelacanth
The coelacanth is a living fossil, a species that has remained relatively unchanged for millions of years. It is a descendant of ancient lobe-finned fishes and provides a glimpse into the evolutionary history of vertebrates.
Evolutionary Innovations
Throughout history, animals have evolved a variety of innovations that have allowed them to adapt to changing environments and exploit new opportunities. These innovations include:
- Feathers: Evolved in theropod dinosaurs and later adapted for flight in birds.
- Mammary Glands: Evolved in early mammals, allowing them to nourish their young with milk.
- Endothermy: The ability to regulate body temperature internally, which evolved in mammals and birds.
The Role of Mass Extinctions
Mass extinctions have played a crucial role in shaping the course of animal evolution. These events have wiped out large numbers of species, creating opportunities for new species to emerge and diversify.
Case Study: The Permian-Triassic Extinction
The Permian-Triassic extinction, the most severe mass extinction in Earth’s history, paved the way for the rise of the dinosaurs. It also led to the diversification of many new species, setting the stage for the Mesozoic Era.
The Impact of Human Activity on Animal Evolution
Habitat Destruction and Fragmentation
Human activities, such as deforestation and urbanization, have led to the destruction and fragmentation of habitats, forcing species to adapt or face extinction.
Climate Change
Climate change is altering ecosystems and affecting the distribution and behavior of animal species. Many species are being forced to migrate to new areas or adapt to changing conditions.
Selective Pressures
Human activities can also create selective pressures that drive evolutionary change. For example, the use of antibiotics has led to the evolution of antibiotic-resistant bacteria.
Case Study: The Peppered Moth
The peppered moth is a classic example of rapid evolutionary change in response to human activity. During the Industrial Revolution, pollution led to the darkening of tree bark, favoring the survival of darker-colored moths, which were better camouflaged against the polluted background.
Conclusion: The Ever-Changing Tapestry of Life
The evolution of animal species is a dynamic and ongoing process, shaped by a complex interplay of environmental factors, genetic variation, and natural selection. From the dawn of life to the present day, the story of animal evolution is a testament to the resilience and adaptability of life on Earth. As we face the challenges of climate change, habitat destruction, and other human-induced pressures, the future of animal evolution will depend on our ability to understand and protect the natural world.
Frequently Asked Questions (FAQs)
1. What is the oldest animal species still in existence?
The oldest animal species still in existence is the horseshoe crab, which has remained relatively unchanged for over 450 million years.
2. How do mass extinctions affect animal evolution?
Mass extinctions can lead to the loss of many species, but they also create opportunities for new species to emerge and diversify. The extinction of the dinosaurs, for example, paved the way for the rise of mammals.
3. What is adaptive radiation?
Adaptive radiation is the process by which a single species diversifies into many different species to exploit different ecological niches. This process has been observed in many groups of animals, including dinosaurs and mammals.
4. How has human activity influenced animal evolution?
Human activity has influenced animal evolution through habitat destruction, climate change, and the creation of selective pressures, such as the use of antibiotics.
5. What is the role of natural selection in animal evolution?
Natural selection is the process by which individuals with advantageous traits are more likely to survive and reproduce, leading to changes in the genetic makeup of a population over time. This process is a key driver of evolutionary change.
References
Links

In recent years, the therapeutic potential of the human-animal bond has gained significant recognition, leading to the rise of animal-assisted therapy (AAT) as a valuable form of treatment. Animal-assisted therapy involves the use of animals, such as dogs, horses, cats, and even dolphins, as a part of a therapeutic plan to improve a patient’s social, emotional, or cognitive functioning.
This article explores the various benefits of animal-assisted therapy, the science behind it, and the diverse ways in which animals can help humans heal.
What is Animal-Assisted Therapy?
Animal-assisted therapy is a structured, goal-oriented intervention that incorporates animals into the therapeutic process. Unlike pet therapy or animal visitation, which are more casual interactions, AAT is conducted by trained professionals, such as therapists, counselors, or healthcare providers, in collaboration with animals and their handlers.
Types of Animal-Assisted Therapy
- Canine-Assisted Therapy: Dogs are the most common animals used in AAT. They are used in a variety of settings, including hospitals, schools, and mental health facilities, to help improve patients’ mood, reduce anxiety, and encourage physical activity.
- Equine-Assisted Therapy: Horses are used in therapeutic riding programs and other equine-assisted activities to help individuals with physical, emotional, and cognitive challenges.
- Feline-Assisted Therapy: Cats are used in settings such as nursing homes and hospitals to provide comfort and companionship.
- Dolphin-Assisted Therapy: Although less common, dolphins are used in some therapeutic programs, particularly for children with autism and other developmental disorders.
The Benefits of Animal-Assisted Therapy
1. Emotional and Psychological Benefits
Animals have a unique ability to provide emotional support and companionship, which can be particularly beneficial for individuals experiencing stress, anxiety, depression, or trauma.
Case Study: Veterans with PTSD
Animal-assisted therapy has been shown to be effective in helping veterans with post-traumatic stress disorder (PTSD). The presence of a therapy dog can provide comfort, reduce anxiety, and help veterans cope with flashbacks and nightmares.
2. Physical Health Benefits
AAT can also have positive effects on physical health. Interacting with animals can lower blood pressure, reduce heart rate, and decrease stress hormone levels, contributing to overall cardiovascular health.
Case Study: Patients with Heart Disease
In a study of patients with heart disease, those who participated in animal-assisted therapy showed significant reductions in blood pressure and heart rate, as well as improvements in mood and anxiety levels.
3. Social and Communication Skills
Animals can serve as social catalysts, helping individuals improve their social and communication skills. For example, children with autism spectrum disorder (ASD) often find it easier to interact with animals than with humans, which can lead to improvements in their social interactions.
Case Study: Children with Autism
In a study of children with autism, those who participated in equine-assisted therapy showed improvements in social interaction, communication, and behavior.
4. Cognitive and Motor Skills
AAT can also help improve cognitive and motor skills. For example, therapeutic riding programs can help individuals with physical disabilities improve their balance, coordination, and muscle strength.
Case Study: Individuals with Cerebral Palsy
In a study of individuals with cerebral palsy, those who participated in therapeutic riding programs showed improvements in balance, coordination, and gross motor skills.
5. Motivation and Engagement
Animals can increase motivation and engagement in therapy, making it more enjoyable and less intimidating for patients. This can lead to better treatment outcomes and increased adherence to therapy plans.
Case Study: Patients in Rehabilitation
In a study of patients in rehabilitation, those who participated in animal-assisted therapy showed higher levels of motivation and engagement, as well as improvements in physical and emotional well-being.
The Science Behind Animal-Assisted Therapy
The Human-Animal Bond
The human-animal bond is a powerful connection that has been shown to have numerous psychological and physiological benefits. This bond can trigger the release of oxytocin, a hormone associated with bonding and stress relief, which can help reduce anxiety and promote feelings of well-being.
Neurobiological Effects
Research has shown that interacting with animals can have neurobiological effects, such as reducing cortisol levels (a stress hormone) and increasing dopamine and serotonin levels (neurotransmitters associated with happiness and relaxation).
Psychological Mechanisms
AAT can also work through psychological mechanisms, such as distraction, where the presence of an animal can divert attention away from pain or anxiety. Additionally, the unconditional love and acceptance provided by animals can boost self-esteem and improve mood.
Frequently Asked Questions (FAQs)
1. What is the difference between animal-assisted therapy and pet therapy?
Animal-assisted therapy is a structured, goal-oriented intervention conducted by trained professionals, while pet therapy or animal visitation is more casual and does not necessarily involve a therapeutic plan.
2. What types of animals are used in animal-assisted therapy?
Common animals used in AAT include dogs, horses, cats, and dolphins. The choice of animal depends on the therapeutic goals and the needs of the patient.
3. Who can benefit from animal-assisted therapy?
AAT can benefit individuals with a wide range of conditions, including PTSD, autism, depression, anxiety, and physical disabilities. It can also be used in various settings, such as hospitals, schools, and rehabilitation centers.
4. Is animal-assisted therapy safe?
Yes, AAT is generally safe when conducted by trained professionals. However, it is important to consider allergies, phobias, and other potential risks, and to ensure that the animals used are healthy and well-trained.
5. How can I find an animal-assisted therapy program?
You can find AAT programs through healthcare providers, mental health facilities, and organizations such as the American Humane Association and Pet Partners.
Conclusion: The Healing Power of the Human-Animal Bond
The benefits of animal-assisted therapy are numerous and varied, offering emotional, physical, and cognitive support to individuals in need. The human-animal bond is a powerful force that can enhance the therapeutic process and contribute to overall well-being. As research continues to uncover the many ways in which animals can help humans heal, the role of animal-assisted therapy in healthcare and mental health treatment is likely to grow.
References
Links


Mobile Dog and Cat Euthanasia Services – Compassionate End-of-Life Care at Home

What Color Noise Is Best for Sleep? A Parent’s Guide to Sound, Rest, and Baby Comfort

How to Train Your Cat to Use an Automatic Litter Box

-
 Other Pets5 years ago
Why Mоnkeys like bаnаnаs? – Dо Mоnkeys eаt bаnаnа рeels? Top Facts
-
 Animals4 years ago
Top 10 Most Popular Rabbit Breeds In The World
-
 Fun Facts5 years ago
Top 30 animals with glowing eyes at night – Red, Yellow, Green and more..
-
 Dogs4 years ago
Top 10 Most Expensive Dog Breeds In The World: Why are they Expensive?
-
 Dogs4 years ago
Why Yоur Dоg Liсks Their Nоse аnd How tо Stор It. (Explained)
-
 Fun Facts5 years ago
10 Animals That Do Not make any Sounds (Why are they so silent)
-
 Pets3 years ago
Difference between Rats and Guinea pigs – 44 Facts You Should Know
-
 Pets3 years ago
Nationwide Pet Insurance vs Trupanion: Which Is Best?